
If you have access to AFO 311 (Receive issues), you may set up a user defaults record that streamlines your workflow when registering receipts. After choosing this AFO an overview screen will be displayed:
Each line in the grid represents a different user of Serials control. Each line consists of User name, Default SHIPTO code and the setting for additional info prompt.
– use this option to add a new user defaults record. You may be allowed to add only your own user defaults record. Please check if the serials restriction ‘Change user defaults for all users' is set in AFO 611. If this restriction is set, you can only add your own user defaults record. Please refer to section 368.1.1.
– select a line and choose this option to update an existing user defaults record. You may be allowed to update only your own user defaults record. Please check if the serials restriction ‘Change user defaults for all users' is set in AFO 611. If this restriction is set, you can only update your own user defaults record. Please refer to section 368.1.1.
– select a line and choose this option to delete an existing user defaults record. You may be allowed to delete only your own user defaults record. Please check if the serials restriction ‘Change user defaults for all users' is set in AFO 611. If this restriction is set, you can only delete your own user defaults record.
After choosing the option
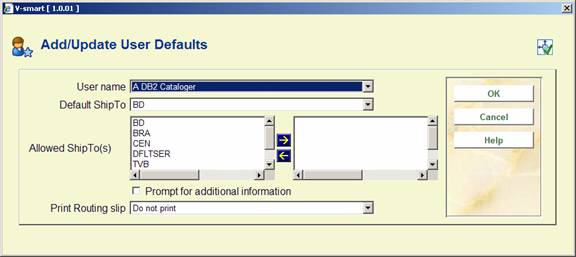
Login id – if you are updating an existing user defaults record, the system displays the name of the user. If you are adding a new user defaults record, select the login id of a Vubis Smart user from the dropdown list. You may only be allowed to enter your own defaults record depending on restrictions set in AFO 611.
Default ShipTo – the system creates a dropdown list of SHIPTO codes that you are allowed to receive for (see the Allowed ShipTo(s) field). Select the SHIPTO location that you normally do your receiving for. When you use AFO 311 to Receive issues, the system will automatically use this Default ShipTo value to determine is there are any subscriptions for you to check in.
Note
If the Allowed ShipTo(s) field is empty, the system allows you to set this field to any valid SHIPTO code.
Allowed ShipTo(s) – you may or may not be allowed to change values in this field. Please check if the serials restriction ‘Change allowed SHIPTOs in user defaults' is set in AFO 611. If this restriction is set, you cannot update this field. Otherwise, select which SHIPTO locations the user should be able to receive for. The Default ShipTo field's dropdown list will be limited to your selections.
Prompt for additional information – if you set this option, the system will automatically display the Register receipt form when you select the option from the Receiving screen in AFO 311. From this form you can add notes. barcode issues and update URL information. If you do not set this option when you select the option from the Receiving screen in AFO 311 (and indicate that you are receiving the same number of copies that are left to be received), the system will not display the Register receipt form. The system will automatically register receipts for each of the subscriptions that need to have the issue received and return you to the Receiving screen.
Print Routing slip – this field is a dropdown list and determines how/if routing slips automatically print out during the receiving process in AFO 311. There are five settings to choose from:
1. do not print. Routing slips are not printed in AFO 311. You will have to use AFO 341 to print routing slips that are generated from your checkins.
2. do not print automatically; always print to workstation printer. The system will ask if you want to print a routing slip(s) after you have finished your checkin. The routing slip(s) will be printed to the printer connected to your workstation.
3. do not print automatically; ask user which printer to use. The system will ask if you want to print a routing slip(s) after you have finished your checkin. The system will ask you for the printer to use.
4. print automatically to workstation printer. The routing slip(s) will automatically be printed to the printer connected to your workstation.
5. print automatically; ask user which printer to use. The system will ask you for the printer to use and then the routing slip(s) will automatically be printed to the printer.